


Step Two: Process It
The second step is to process the material that you aquired and placed in your graphics program in step one. When possible, do this at a much higher resolution than the final image will have, and with extra material around the edges. Generally, the higher resolution you work at, the more believable the final image will look. Low res processing tends to impart a grainy or pixelated look that, in the game, gives the impression of looking at an image rather than at an object.
Processing is often the most difficult step, and one you will usually spend the most time on. You may also find yourself repeating parts of this step several times. It's a good idea to save each major step as a separate version of the file so you can start back there if needed. When you see the graphic in the game, you'll see things you can't believe you overlooked while processing. If you name the Photoshop (or whatever program you're using) file versions A, B, C, and so on, and then later (step 6) name the completed .BMP or .PNG files -01, -02, -03, and so on, it will make data management much easier. Do the work on each graphic in its own folder so you don't end up with hundreds of files to sort through when importing them into your wad.
The purpose of processing is multi-fold:
- Correct or creatively alter the levels
- Straighten the image, and even up anything that isn't uniform but should be
- Skew or distort anything that creates an objectionable pattern when tiled
- Remove anything distracting, like spots that are too bright or too dark, things that call undue attention to themselves when seen in the game, and so on
- Enhance anything that you want the players to be sure to see, such as a crack in a wall, mortar between blocks or bricks, drips of blood or rust, or pock marks
- Experiment with coloring
- Defile it where it looks too pretty
- Make it match the DooM world or the theme of the TC you're creating for
Let's look at each of these in more detail.
Altering the Levels
Before and after auto-
correcting Levels in Photoshop
The levels of light of various colors in a photo or scan are subject to all sorts of real-world variables. Most of them will provide a much more solid foundation for further processing if the levels are corrected or altered first. Sometimes, you need to make an image look more like you perceived it when you took the photo or scan. In that case, auto-correction will usually do the trick. Other times, you need to make it look less like something from the real world and more like something you'd expect to see in the DooM world. Then you have to play with the levels a bit until it feels right. Often, it works out best to auto-correct first, then play with the levels a bit. After you've done a few, you'll get a feel for what the DooM engine likes and doesn't like, levels-wise.
Straightening and Evening Things Up
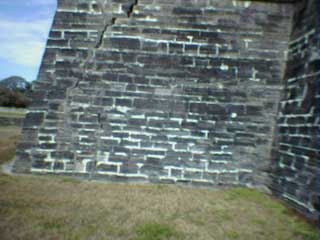
Original image (shown half size)
· · ·
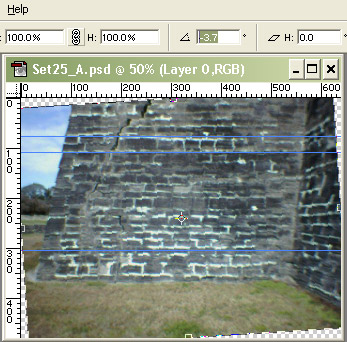
Straightening in Photoshop
with guides and Rotate
If your source material is a photograph or a scan, it will almost never be perfectly straight. Of course, not all images can be judged "straight" or "crooked" but most can. Even something as loosely organized as wood grain can cause disorientation in the game if it is not relatively straight sideways or up and down. Besides, straightening whatever lines there are helps a lot when it comes to tiling in a later step.
Place guidelines so that they will fall near the strongest lines that need straightening, then rotate the image (Photoshop: Edit/Transform/Rotate or CTL-t) until things line up as well as possible. You should already be able to start to see why it's important to have extra material around the part you intend to keep. You want to do as much processing as possible before you crop away the extraneous material. It can come in very handy for fixes and tiling.
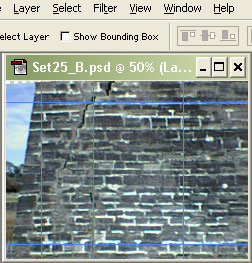
After rotating the image, it probably needs a little sharpening or unsharp mask to compensate for the inevitable blurring. At this point, you can clear the guides used for straightening and place new ones approximately where you think you will be cropping it later on. If there's lots of excess image (such as in the example above), you can trim that away if you want. Just leave plenty of similar material around the final image area. Edge material is your friend. Sometimes, you will end up with the best tiling by copying from just below your lower crop line and pasting it just below your upper crop line, or same idea left to right.
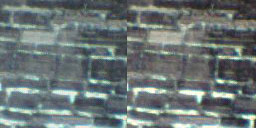
Distorting
Skewing the image so a
major element will tile
Distorting, skewing, and applying perspective are used for getting edge elements to line up so that tiling will be easier later on, or to correct the perspective, or to make different areas of the image look similar enough to be more believable.
Maybe there's a crack in a wall running from top to bottom that you really like but it meets the bottom of the image in a little different place than it meets the top. In Photoshop or any program that allows you to create layers, this is a good time to make a new layer out of the current image so that if you screw up you can just delete the new layer and try again. Once again, use a guideline placed half way between the two ends of the crack, and skew the top and bottom until both ends cross at the guideline.
Or, maybe your best photo of an old block wall happened to be taken at a slightly upward angle, and it looks funny in the game. The Perspective tool can be used to narrow the bottom and/or widen the top of the graphic until the blocks appear to be about the same size.
Sometimes you might need to stretch, shrink, or skew parts of the image for other reasons. For instance, a rectangular portion of an image can be stretched in one direction to cover up a neighboring troublesome area.
Removing Distracting Elements
Original image portion
· · ·
Repaired with Photoshop's
Stamp tool
There are several ways to remove a distracting element:
- Draw or paint over it
- Smudge it
- Blur it
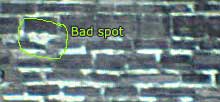
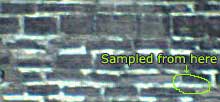
- Copy from another area, especially from an area that will likely get cropped away later, and paste it over the bad spot
- Use Photoshop's Stamp tool to cover it up
- Darken or lighten it until it no longer distracts
While copy/paste works fine, it can be quite a lot of work to smooth out the edges so it doesn't look pasted in. The advantage of Photoshop's Stamp tool is that, if you use a brush with fuzzy edges, you can see instantly whether or not the chosen stamp point will work, because the edges are automatically smoothed out for you. The repair shown on the right was done in just a few seconds. The area I sampled will likely be cropped away later, which lessens the chance the a repeated area will draw attention.
Enhancing Elements
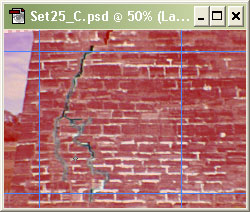
Selecting an element in
Quickmask mode
Sometimes an element of a graphic will need to stand out more than it naturally would to enhance the atmosphere of a world defiled by evil. In the example at right, I have used Photoshop's Quickmask feature to quickly and easily select the crack in the wall. In Quickmask mode, you use the eraser tool to select, and the pencil tool to deselect, whatever area of the image you want to include or exclude from the following task or tasks. When you leave Quickmask mode, whatever was "erased" is now selected, and whatever was left masked is not.
With the crack selected, I can use the Unsharp Mask tool to enhance it as much as I want without affecting the rest of the image.
Re-coloring
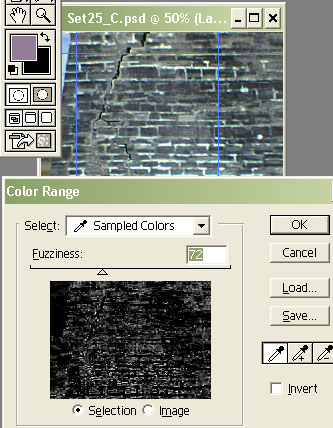
Selecting a Color Range in Photoshop
Digitized photos tend to contain pixels of unexpected colors here and there. Some of these can end up being obnoxious after a certain amount of processing, and especially after conversion to the DooM palette.
The photo in the example had quite a lot of various shades of lavender, which could end up being almost anything from bright red to bright blue after conversion to the Doom palette. After selecting a pixel of medium lavender, the Color Range tool can be used to select all lavenderish pixels in the image, simply by adjusting the Fuzziness slider. After closing the tool, the Hue/Saturation tool can be used to either reduce the saturation or change the hue to a color that will convert better. After dealing with the lavenders in this photo, I did the same thing to the blues.
Another form of re-coloring is adjusting brightness and contrast. Often, after seeing your graphic in the game, you will find that part or all of it needs adjustment of the brightness and/or contrast. It's one of the things that most strongly affects the realism and mood of the graphic, in my experience.
Often, a photo will have light regions and dark regions that need to be balanced. You can use the Dodge and Burn commands in Photoshop for that. Another way to deal with it is to select the bright or dark region as well as possible, feather the selection over several pixels, then alter either the lightness, brightness, or levels until it matches the surrounding area.
Defiling
DooM's WALL72_7
has bullet holes
and slime stains
One of the most subtle but important characteristics of most good DooM graphics is how they reveal the nature of the DooM world. If you examine the original DooM textures created by id, you will notice that many of them show varying degrees of defilement: scratch marks, pock marks, weathering, blood stains, nukage stains, occult-like symbols, and all kinds of things like that. There are exceptions, of course, where suitable, like the SHAWN textures, which are meant to be used for the smooth sides of lifts and machines and so forth. Not all the step textures are defiled, either, naturally, nor are most of the computer textures. But many of the textures you will create will need to show some damage. How to do that will depend on the nature and purpose of the texture. It's more art than technique. Let your creative juices flow and follow them.
Matching
One of the most frustrating things that can happen to a video game graphics designer is to spend hours on a wonderful texture or flat, and then find that, as good as it looks in its own right, it looks out of place among the other graphics. Unless you're designing for a TC, keep a few original DooM graphics open in your editing program for comparison. Keep compatibility in mind the whole time, from concept to completion. Even then, you'll sometimes miss, but it will help to reference the originals from time to time.
There are no firm rules for this processing. You have to train and then trust your instincts. Think ahead about whether you might need material from a part of the image that will get cropped away in the next stage. Processing can't be completely separated from the following steps, especially from cropping and tiling. Much of your processing will be done in order to tile better, and in consideration of where it will be cropped.


